Cherry wood carving
Are you interested in trying your hand at carving cherry wood? Cherry wood carving is a type of wood carving in which cherry wood is used as the main material. Cherry wood is prized for its beautiful reddish-brown color, smooth texture and fine grain, making it an excellent choice for various carving projects. This type of wood is relatively soft and easy to work with, making it popular with beginners and experienced carvers. Cherry wood is often used to create intricate designs, delicate figures, and detailed sculptures. Many carvers also appreciate cherry wood for its ability to produce a high surface finish, giving carved objects a smooth and polished appearance. Overall, cherry wood carving is a popular and rewarding hobby that allows woodcarvers to create beautiful and unique works of art.
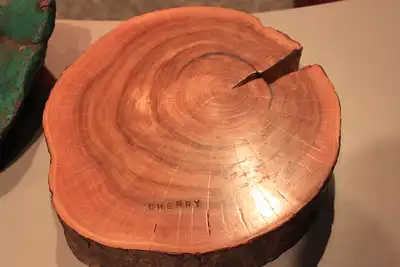
Characteristics of cherry wood
The heartwood of the cherry tree differs in oloroso. You have some in rich red to reddish-brown, which darkens with age and exposure to light. Sapwood is creamy white, and cherry wood has a straight-grain, fine, uniform, satiny and smooth texture. Sometimes it comes with brown pith flecks and small gum pockets.
Cherry wood is easy to machine and nails and glues well. When sanded and stained, it produces an excellent, smooth finish. It dries quickly with moderately high shrinkage and becomes stable after kiln-drying.
Cherry is of medium density and with good bending properties, low stiffness, medium strength, and shock resistance. It is readily available online, in-store, and in U.S. fields. It is for professionals and homeowners since the beautiful wood is easy to work with.
It becomes richer with age. Cherry wood is reddish-brown with a golden hue. When still wet, it is paler. The heart and sapwood of the cherry tree are easy to identify, and the sapwood is narrow and yellowish. Cherry wood has exceptional workability due to its straight-grained qualities.
Prepare it before it undergoes the staining process to avoid blemishes. Use a sanding sealer or a gel-based stain. Cherry hardwood is durable since the heart is resistant to rot and decay. It is for many different applications due to its flexibility. It has medium density, bending properties, and stiffness.
Cherry hardwood is more affordable than walnut wood and workable than maple and oak. Its availability is not harvested as often as other types of wood, although it is not scarce. It is flexible and comes with an array of colors and patterns, and its physical properties make it a versatile wood that you can use in endless applications.
Is Cherry Wood good for carving?
Cherry wood is great for chip carving and chainsaw carving. However, using the lumber for whittling is difficult since your carving tool finds it difficult to pierce into the grain, and it gets even more complex when the cherry timber has dried through.
Wild cherry is not the best choice for whittling, but it remains a perfect wood for intricate carving methods. These include relief carving, which can hold details well, and green wild cherry wood works better on carvings.
It refers to the freshly cut cherry wood from the tree that has not been dried. It is easy to cut and shape and has a moisture content of 100%, making it easy to carve. When the cherry wood starts drying, the moisture content goes down below 20%, and it becomes prone to shrinkage, leading to cracking and splitting.
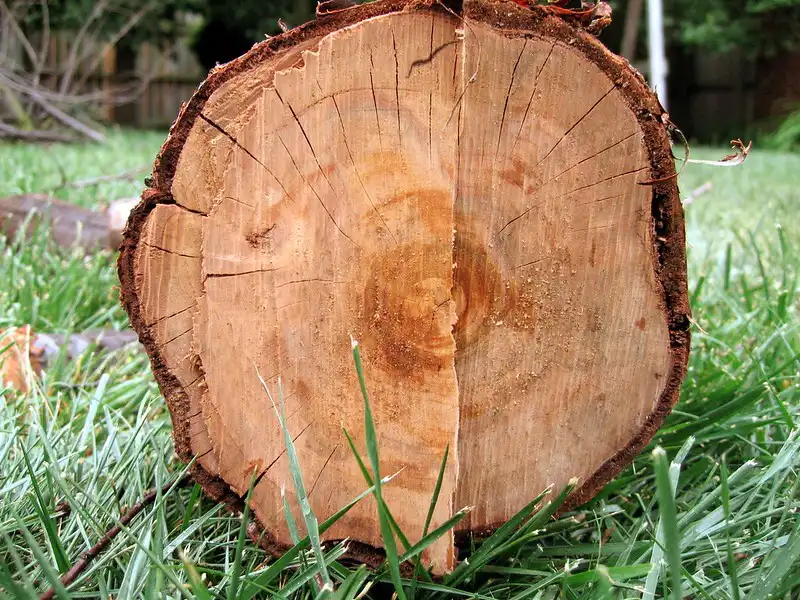
Cherry wood tends to crack, but it depends on the part of cherry wood lumber you are using. The tree trunks consist of 5 essential parts; the outer bark, inner bark, cambium, sapwood, and heartwood. Cherry sapwood, the outermost pale portion of the trunk, tends to crack as it dries.
It has the most build-up of moisture. So as the moisture evaporates, the sapwood shrinks and eventually cracks. Cherry heartwood does not absorb moisture easily, which is why it neither shrinks nor cracks as much as it dries.
So, if you are carving into cherry heartwood, the cherry is less likely to crack as it dries out. But, if you are wood carving into the sapwood, the cherry is more likely to crack as it dries out. Even if there is heartwood at the center of the sapwood lumber, if the sapwood cracks, it also splits the heartwood. Avoid using cherry sapwood for wood carving to avoid cracks.
You can tell the two apart as the sapwood section of the trunk is lighter than the heartwood. Allow the cherry wood to dry slowly to avoid cracks as well. That allows cherry wood to air-dry more naturally than kiln-drying. The process takes up to 60 days.
How Do You Protect Cherry Wood?
Use a natural oil finish to seal, protect, and finish a cherry wood project. Apply a few coats of an all-natural linseed oil or tung oil coat in a pinch. These oil finishes can sink into the dense pores found in cherry wood.
Cherry Woodgrain
Cherry hardwood has a straight grain, is uniform, and has a smooth texture. The grain has dark wavy streaks and is farther apart and softer than Mahogany. Cherry comes with a red hue that can be stained any color.
What is cherry wood good for?
Since cherry wood comes from a tree that bears edible fruit, lumber food is safe. Using cherry wood, you can make kitchen utensils such as spoons and cutting boards. It makes fine furniture and cabinets, molding and millwork, floors, doors, boat interiors, musical instruments, turnings, and carvings.
Best way to prepare cherry wood
Oil it, spray it, shellac it, or glaze it. That makes cherry look great. Cherry boards come in different colors; their sapwood and heartwood do not match. Its color varies from board to board, and for an easy finish, choose wood boards that look the same.
Some suppliers sell boards from the same tree to ensure a good match. Usually, though, you’ll be on your own. When using solid cherry and cherry plywood, stand the solid stock against the veneer in good, natural light to compare the colors.
Wetting the surfaces with mineral spirits gives you an indication of color. When exposed to air and light, Cherry darkens over time, and the color changes quickly within hours. Do not use oil stain for a dark color; seal the surface and apply coats of colored glaze for a better finish.
Where to get cherry wood blocks for carving
You get cherry wood from Amazon and eBay in log blanks that have seasoned naturally. They are from Kent-grown cherry trees, and the hardwood logs are seasoned for carving. You get various other log widths and lengths on the website. There are always new blanks to choose from.
Is Cherry Wood good for making desks?
Cherry wood has a beautiful texture and white to reddish-brown color, making it ideal for making computer desks in office environments. Cherry is great, workable, and has finishing properties in nailing, gluing, screwing, and polishing.
It is shock-resistant and seals the desk once a year to maintain the same color. It is also water-resistant and makes it a good candidate for desk making. Quality hardwoods are better types of lumber to build a desk. Cherry wood can either be a light brown or a deeper reddish-brown color, and these colors are not a problem in desks.
Hardwood substitutes for Cherry
- Oak.
- Walnut.
- Maple.
Can you carve greenwood?
You can carve Greenwood for your carvings. It is easier to cut and shape than dried cherry wood. Since it has a high percentage of moisture content, Greenwood is easy to cut. You are allowed to cut a section of cherry wood and then freeze it to help contain the moisture and greenness. Use Greenwood if the rest of the cherry wood is too hard to cut when dry.
Carving green cherry wood
What is green cherry wood?
Green cherry wood is fresh wood from the cherry plant that has not dried. It is wood chopped from the cherry tree and has the sap and moisture locked inside. Greenwood comes in variations, such as branches you trim off a tree, a tree cut down, and wood that has not dried out yet.
The wood is softer than when it dries out. It allows a sharp knife to make smooth cuts, and you are more likely to split it. Splitting the wood helps you see the grain structure of your spoon blank. When carving with a knife and a hook knife, you can listen to the sound of the wood.
Listening to the grain means looking at the grain of your piece and getting an idea of what kind of spoon fits inside it. Your spoon is made stronger and looks better, as it follows the natural structure of the wood.
Characteristics of green cherry wood
- Fine, uniform, straight grain
- Smooth texture
- Easy to machine
- Nails and glues well
- Heavy
Is cherry wood good for carving?
Cherry wood is great for chip carving or even chainsaw carving. However, using the lumber for whittling is difficult since your carving tool finds it difficult to pierce into the grain, and it gets even harder when the cherry timber has dried through.
Wild cherry is not the best choice for whittling, but it remains a perfect wood for intricate carving methods. These include relief carving, which can hold details well, and green wild cherry wood works better on carvings.
It refers to the freshly cut cherry wood from the tree that has not dried. It is easy to cut and shape. It has a moisture content of 100%, making it easy to carve. When the cherry wood starts drying, the moisture content decreases below 20% and becomes prone to shrinkage, leading to cracking and splitting.
Cherry wood tends to crack, but it depends on the part of cherry wood lumber you are using. The tree trunks consist of five parts; the outer bark, inner bark, cambium, sapwood, and heartwood. Cherry sapwood, the outermost pale portion of the trunk, tends to crack as it dries.
It has the most build-up of moisture. So as the wood moisture evaporates, the sapwood shrinks and eventually cracks. Cherry heartwood does not take on wood moisture easily, which is why it neither shrinks nor cracks as much as it dries.
So, if you are carving into cherry heartwood, the cherry is less likely to crack as it dries out. But, if you are wood carving into the sapwood, the cherry is more likely to crack as it dries out. If the sapwood cracks, it ends up splitting the heartwood too. Avoid using cherry sapwood for wood carving to avoid wood cracks.
You can tell the two apart as the sapwood section of the trunk is lighter than the heartwood. Allow the cherry wood to dry slowly to avoid cracks as well. That allows cherry wood to air-dry more naturally than kiln-drying. The process takes up to 60 days.
Carving green wood vs Dry wood
Carving wood dry is harder than wet. However, the chances of dry wood cracking are lower as it does not hold moisture. Greenwood is ideal for hardwoods that are difficult to carve, and Greenwood is for beginners as it requires less physical effort to cut through the wood. Using both come with pros and cons.
Pros of Green-Wood
- Easy to carve
- Smooth to use with hand tools
- Ideal for beginners as experimental wood
- Convertible into dry wood
- Availability
Cons of Green-Wood
- More moisture leads to splitting.
- Ideal for outdoor projects
- Not a better option for fine detail.
- It leaves a residue on your tools.
- Shrinks when dries
Pros of Dry Wood
- Minimal cracks and more stable
- Ideal for indoor projects
- Better for fine detail
- Versatile
- Ideal for power carving
Cons of Dry Wood
- Harder to cut.
- It takes time to dry.
- Requires more tools to work with.
- Hard to season without experience.
- It requires more energy.
Can you carve greenwood?
Yes, you can carve Greenwood. Unlike dry wood, it is soft, easy, and quick to cut. Handle with care to avoid splitting. The use of hand tools is for Greenwood since power tools are too aggressive to cut through the Greenwood. Carving greenwood saves time and extra costs.
How do you keep Green Wood Green for carving?
If your winter stays below 40 or 50 degrees, you do not have to look for other methods since the chances are high that it keeps fresh till spring. However, warm winters make the wood rot, so you should try the splitting method.
Splitting out parts involves keeping logs big to prevent drying. Seal the ends of the wood log with end-grain sealant to reduce checking. Apply as soon as you finish sawing the log. You can also leave the wood log a few inches longer than you need.
The exposed surfaces develop checks. Keep the bark on the log and your split radial. Do not forget to apply a sealant to tangential surfaces. Make sure you have ways to keep your green cherry wood from rotting. Sapwood is more prone to wood rot than other species, so you should choose any storage methods below.
Roughing out parts
Split the log up and rough out your parts. This method takes a lot of energy. Shape and rough the spindles to an octagonal cross-section and have the backs bent. Rough your turnings to cylinders, so they dry with minimal problems and keep indefinitely.
Wrapping parts
Wrap parts in plastic to prevent drying. The Greenwood stays longer in winter than during summer. However, the wood is prone to molds if it stays longer.
Freezing
Freezing keeps the wood green. When using a self-defrosting freezer, wrap the parts in plastic to avoid dryness.
Soaking in water
Submerging wood in water prevents decay. However, the parts start smelling, and the smell disappears after the wood parts dry. Make use of your pond, watering trough, pipe, or wheelbarrow.
How do you dry green wood for carving?
As green wood starts drying, it cracks from the center out. It can be best to split it in half ahead of time, which takes the stress off and keeps it from splitting in multiple places. Cherry wood is prone to checking. You must seal the ends using wax, Elmer’s glue, or paint.
Repeat the process frequently and keep the Greenwood in a cooler, moist area to slow the drying process.
Leave the wood for longer lengths and soak the ends in radiator antifreeze for about 5 minutes on each end. Allow them to rest in a cool area. Keep the wood out of direct sunlight with enough air movement around them.
Expect some checking, but when the wood has dried and cut off the checked areas for perfect logs. Bear in mind that the process takes more time.
However, this method is a bit unsafe for your wood. The time and temperature method takes long but has a lower chance of spoiling the wood. You can even try wax or paraffin or paint on the ends.
What you should mind is the cracking of the Greenwood. However, there are ways to prevent it, but only if you understand them. You should know how to seal the end of logs to inhibit cracking. You should take a piece of wood as a container filled with water, and when the container shrinks too much, the water inside will burst the sides or spill over.
If it dries, it will shrink and shrink too much, making the volume inside the log break the outside. That makes the wood crack. To prevent shrinking and cracking, the Greenwood outside the wood log is wet, which means keeping the water in the wood.
The reason carvers avoid using green, freshly cut wood is cracking or checking due to the wet wood. A carver should learn how to carve Greenwood. When controlling the wood’s moisture content, you will control the evaporation rate.
The wood dries too quickly, and the outer layer shrinks too much. The inner wood swells with water, forcing the outer layer to crack. Bear in mind that during the carving process, some water evaporates.
Use a spray bottle regularly to dampen the piece. That covers up for moisture loss. When finishing the carving session, spray lightly and cover with a plastic bag. The water in the wood finds a balance of even distribution.
Enclose the carving in a bag to give moisture deep inside the wood, and move toward the drier outside. For a speedy process, coat the piece with light or mineral oil. Long delays when drying are not a problem, but enclosed wood leads to mold. Remove the plastic bag daily for a short period, and replace it over the piece.
Even when done carving, repeat the plastic bag process, and the enclosed carving can be placed in a sunny location to create a solar kiln in which the carving dries slowly.
To minimize cracking, soak the area by placing a damp cloth over the crack or cover the wood crack with a piece of masking tape to prevent more moisture loss from inside the wood crack. Soaking the spot with water makes water migrate from the inside. That is how wood swells, closing the wood crack. Keep filling wood cracks even after carving with a hard substance like wax.
Steps
- Seal the ends.
- Un-seal wood cracks.
- Fill cracks with wax.
- Mist and cover work between carving sessions.

- Grain and Sheen: Teak Oil versus Danish Oil Uncovered - January 10, 2024
- The Cherry on Top: Crafting the Perfect Cutting Board - January 9, 2024
- Polyurethane Water-Based vs Oil-Based: Choosing the Right Finish - January 8, 2024